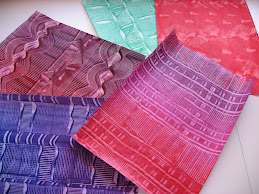
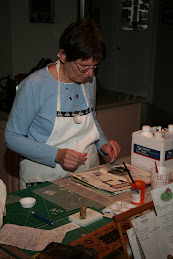
Although papermaking requires a good deal of time, space, and supplies, I still like to do it. This time I wanted to experiment with adding more items to the paper. Making thinner paper and adding color were also goals. As in the last time I made paper, this pulp was made from the scraps of high quality mat board from Clyde Butcher's studio here in Venice. It makes fine paper and breaks down quickly when put in water.
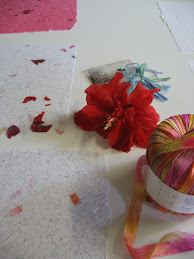
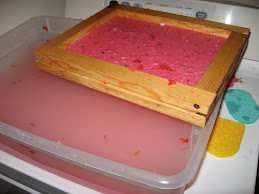
The first step was plotting my course to determine in what order I would add things since once you put stuff in the pulp, you can't get it out for the next sheet! First would come several sheets of plain white, trying for a nice thin piece. Then I would start adding things: first glitter, then silk ribbon pieces, next flower petals and some yarn snippets. After I had a good glitter sheet and one with ribbon that I liked, I decided to go for some color. The simplest method seemed to be to just add colored paper so I mixed up a blender full of red construction paper. When I added it to the pulp tray, the result was a much darker pink than I expected. Nevertheless, I threw in some snips of burgundy fabric as well as some hairy yarn for an interesting result.
Although I was running out of pulp, it seemed sensible to make a couple more sheets of paper while the mess was all over the kitchen, laundry room and garage. One more blender full of white paper pulp lightened the pink color a little and provided enough for three more sheets. The last one fell apart as I couched it but it can be used for something! Twelve sheets of paper are now being pressed flat, almost ready for use.
So it's back to the minibooks now. I finished the Wisconsin Trip book and am working on a similar design using photos of Louise Pike paintings. The book cover is cotton fabric from Ventiane that I found on the ESTY website along with the paper you saw in the Seattle books.
Thursday, May 8, 2008

Tuesday, April 8, 2008
A Minibook
During the past six months, we have made several trips to Wisconsin from Florida, where we live. Some of them were during the winter months when record-breaking snow and cold prevailed. All through the period, ideas and images were percolating in my head and I have begun to put them together in a book. First I created the book itself in an accordian-style format about two inches square with brocade covers. I used marbled paper that I purchased in Florence, Italy, for the end papers. Photos of the bleak winter landscape had accumulated in my digital camera; words to go with them were forming in my mind.
Before the most recent journey, I had pasted a selection of small photos into the book. Most of the haiku-like poems are ready to be lettered onto the pages opposite the photos. This little book doesn't seem to capture the experience, however, so I am contemplating another altered book. I like the altered book concept just because it allows for more wildness and creativity; at the same time, I love the precise little minibooks, too, for their neat and tidy control of both image and word. I think I am advancing toward my goal.
This week I received confirmation of my entry in a Penland School class called "A Survey of Decorative Paper Techniques." I expect to learn more about Asian papermaking, marbling, and other kinds of paper arts at the August 2008 session with Steve Pittelkow. After this one, the next class I take will be in binding.
Before the most recent journey, I had pasted a selection of small photos into the book. Most of the haiku-like poems are ready to be lettered onto the pages opposite the photos. This little book doesn't seem to capture the experience, however, so I am contemplating another altered book. I like the altered book concept just because it allows for more wildness and creativity; at the same time, I love the precise little minibooks, too, for their neat and tidy control of both image and word. I think I am advancing toward my goal.
This week I received confirmation of my entry in a Penland School class called "A Survey of Decorative Paper Techniques." I expect to learn more about Asian papermaking, marbling, and other kinds of paper arts at the August 2008 session with Steve Pittelkow. After this one, the next class I take will be in binding.
Thursday, February 21, 2008
Another Detour
Although I figure all bookmaking experience is related to my end goal, I am still finding projects that take me away from the direct path to creating my own book. In this case, I ordered some handmade paper through the ESTY website. It came from Ventiane, which I had to look up in our atlas. (It is in Laos.) These were great huge sheets of lovely tough paper with ferns and plants embedded. So of course I had to make something with them. I had the idea that I would like to make some little books for my daughter, son-in-law and grandson to take on their forthcoming trip to Seattle. I had seen a fascinating project at the University of Wisconsin when we were visiting our son Chris in January. Some handmade books were given to students about to embark on an international trip. They were asked to use the books to keep a log of the trip. The result was unexpected. These accounts were graphic, profane, creative and spontaneous. Stuff was stapled into them, glued, drawn, written, and folded. The books were pocket-size so they could be carried anywhere. This was my inspiration for the Seattle books. I found instructions in Peter Thomas' book for a binding that was folded rather than stitched. From those I made a practice book. Then I made two for some book baskets I was putting together for a fund-raiser for All Faiths Food Bank. Finally I made the ones for Kim, Chip and Trevor. You can see them in the photo. Inside I combined a variety of papers: my own handmade paper, some handmade Japanese paper, graph paper, and drawing paper. I stuck a pencil in the spine.
We have one more trip to Wisconsin and then I will concentrate more on improving my bookmaking skills. I have signed up for another Penland class. I don't yet know which one I will get into. I also tried to register for the Paper and Book Intensive, which this year is at Arrowmont in May. I am on the waiting list so I don't expect to attend.
We have one more trip to Wisconsin and then I will concentrate more on improving my bookmaking skills. I have signed up for another Penland class. I don't yet know which one I will get into. I also tried to register for the Paper and Book Intensive, which this year is at Arrowmont in May. I am on the waiting list so I don't expect to attend.
Saturday, December 29, 2007
Sidetracked into an Altered Book
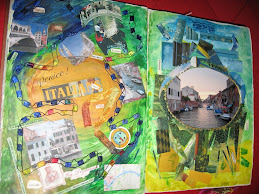
When I returned from Italy, I wanted to write up the notes I had made during the trip so I spent some time putting together text and photos. Then my grandson Trevor told me about his high school art project in which he had made an "altered book". It sounded like a lot of fun. My daughter Kim said she wished she could make one, maybe about our trip and pretty soon I formed the idea of creating an altered book about the Italy adventure.
Our library has several books on how to do it so I read a little first and then began to design the book. First I found the base book that I would use in the Friends of the Library bookstore. It was a library discard, outdated but with useable photos and just the right size. It cost me fifty cents. The title was The Italians. I glued pages together, painted them, collaged, cut holes, decorated, transferred images in various ways, sewed in pages, and had lots of fun working on it.
Warning! This is a very time-consuming enterprise. It was taking me almost a day per page. Sometimes I had to wait hours for the glue to dry before I could advance to the next step. All in all, I think it took me about three months to make the book. The final step was to glue in the new end pages (marbled paper I had purchased in Florence) and make a new cover. The front cover I made with Spackle, a plaster-like substance. When it was dry, I painted it bright colors using acrylics. I tied a few Italian yarns into the holes I had made inside to attach the journal text.
Needless to say, I did not make paper, or work much toward my real book while I was engaged in the construction of the altered Italy book. I gave the book to Kim as a souvenir of our trip together.
Our library has several books on how to do it so I read a little first and then began to design the book. First I found the base book that I would use in the Friends of the Library bookstore. It was a library discard, outdated but with useable photos and just the right size. It cost me fifty cents. The title was The Italians. I glued pages together, painted them, collaged, cut holes, decorated, transferred images in various ways, sewed in pages, and had lots of fun working on it.
Warning! This is a very time-consuming enterprise. It was taking me almost a day per page. Sometimes I had to wait hours for the glue to dry before I could advance to the next step. All in all, I think it took me about three months to make the book. The final step was to glue in the new end pages (marbled paper I had purchased in Florence) and make a new cover. The front cover I made with Spackle, a plaster-like substance. When it was dry, I painted it bright colors using acrylics. I tied a few Italian yarns into the holes I had made inside to attach the journal text.
Needless to say, I did not make paper, or work much toward my real book while I was engaged in the construction of the altered Italy book. I gave the book to Kim as a souvenir of our trip together.
Step Three: another try at making paper and printing
What luck! I was able to get some pristine white mat board from the Clyde Butcher studio - scraps that they had left over after framing the photos. I used this as the basis for the next batch of paper and it turned out pretty well. I have since used some of the paper in a small book I made plus I have used a couple of sheets as envelopes. Again I tried incorporating plant parts and yarn into the paper.
In order to practice bookbinding, I took apart an old book, pulled out the stitching, took the glue off spine, and threw away the cover. Then I put it all back together and created a new cover. After I successfully rebound the book, I tried binding a small book of my own. Into this one, I put a few pages of my own paper. A good start toward my real book! Now I know I can actually do it!
At holiday time I printed cards using a linoleum block print. More good practice. Sometime after the first of the year, I will make more paper and start planning the book.
One problem is that I am easily side tracked into projects that seem like fun. (Right now I am thinking about the other things I might make with paper pulp!)
In order to practice bookbinding, I took apart an old book, pulled out the stitching, took the glue off spine, and threw away the cover. Then I put it all back together and created a new cover. After I successfully rebound the book, I tried binding a small book of my own. Into this one, I put a few pages of my own paper. A good start toward my real book! Now I know I can actually do it!
At holiday time I printed cards using a linoleum block print. More good practice. Sometime after the first of the year, I will make more paper and start planning the book.
One problem is that I am easily side tracked into projects that seem like fun. (Right now I am thinking about the other things I might make with paper pulp!)
Tuesday, April 3, 2007
Step Two: another try at printing
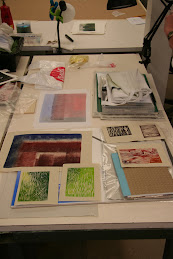
It is clear that I need much more experience in each of the areas required for my book. I was really floundering around as I made paper. I am sure I will improve though. Another area that requires practice is printing. In preparation for the trip I am taking to Italy, I am making additional mini-books as gifts/mementos for my cousins. Although there are still printed pieces available from the work I did at Penland, I need more variety so I set up the press. It took about an hour to make four prints from one of the blocks I made at Penland.
I was unhappy with the results. First, my press doesn't create enough pressure to make really good prints from this kind of artsy surface. Second, my inks were too gummy to give me the kind of impression I wanted. However I had one sheet that I can use to make the illustrations for the little books. And I got more practice!
Next I should spend some time printing with type. Binding is another skill that is going to take a lot of work. That will probably require a class.
I was unhappy with the results. First, my press doesn't create enough pressure to make really good prints from this kind of artsy surface. Second, my inks were too gummy to give me the kind of impression I wanted. However I had one sheet that I can use to make the illustrations for the little books. And I got more practice!
Next I should spend some time printing with type. Binding is another skill that is going to take a lot of work. That will probably require a class.
Step One
What a messy process it is to make paper! First I had to figure out where to do it. I decided the garage and laundry room were the most impervious to the water I expected to splash around. I had watched the video on papermaking by Catherine Nash several times so I would know what I needed and could visualize the steps. I had all my supplies. Since this was simply a practice session, not a time to make the real paper for my book, I decided to use the junk mail paper I had shredded plus some dryer lint as the basis. I soaked it overnight and then ran it through the blender in small batches until I had a tub full. That took an hour or so. I set the tub on the dryer in the laundry room. The couching surface was on the washer nearby which I covered with towels and felt. In the garage, I had set up a table with a drying board (actually a "white board" I bought at Lowes). It needed to be smooth to give my paper a smooth finish. The pulp was gray, which I expected because the junk mail was printed paper. The ink makes it gray. When I make the real paper, I will use white pulp.
This was very good practice. I could see that I had made the pulp a little thick. The paper was heavier than I wanted. When I tried to thin down the pulp, however, it stuck to the screen. This will take some practice to get the thickness I want. I dipped the screen, got a nice batch of pulp and let it drain. Then I tipped the layer onto the couching surface. I blotted it dry, took it to the garage drying board, and rolled it with a blotter. This was to dry the paper further and make sure it stuck to the board. After a couple of sheets, I decided to add some stuff to the pulp: flowers and cut up raffia. I liked the appearance of the flowers; however when the paper dried, the petunia petals turned brown. The rest of the flowers retained their color. Another area for practice!
After several hours of work, I had eight sheets of paper. This is not going to be a very efficient process, I can see that. Of the eight, there was one I liked. But I learned a lot!
This was very good practice. I could see that I had made the pulp a little thick. The paper was heavier than I wanted. When I tried to thin down the pulp, however, it stuck to the screen. This will take some practice to get the thickness I want. I dipped the screen, got a nice batch of pulp and let it drain. Then I tipped the layer onto the couching surface. I blotted it dry, took it to the garage drying board, and rolled it with a blotter. This was to dry the paper further and make sure it stuck to the board. After a couple of sheets, I decided to add some stuff to the pulp: flowers and cut up raffia. I liked the appearance of the flowers; however when the paper dried, the petunia petals turned brown. The rest of the flowers retained their color. Another area for practice!
After several hours of work, I had eight sheets of paper. This is not going to be a very efficient process, I can see that. Of the eight, there was one I liked. But I learned a lot!
Subscribe to:
Posts (Atom)