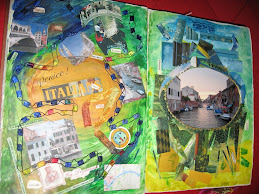
When I returned from Italy, I wanted to write up the notes I had made during the trip so I spent some time putting together text and photos. Then my grandson Trevor told me about his high school art project in which he had made an "altered book". It sounded like a lot of fun. My daughter Kim said she wished she could make one, maybe about our trip and pretty soon I formed the idea of creating an altered book about the Italy adventure.
Our library has several books on how to do it so I read a little first and then began to design the book. First I found the base book that I would use in the Friends of the Library bookstore. It was a library discard, outdated but with useable photos and just the right size. It cost me fifty cents. The title was The Italians. I glued pages together, painted them, collaged, cut holes, decorated, transferred images in various ways, sewed in pages, and had lots of fun working on it.
Warning! This is a very time-consuming enterprise. It was taking me almost a day per page. Sometimes I had to wait hours for the glue to dry before I could advance to the next step. All in all, I think it took me about three months to make the book. The final step was to glue in the new end pages (marbled paper I had purchased in Florence) and make a new cover. The front cover I made with Spackle, a plaster-like substance. When it was dry, I painted it bright colors using acrylics. I tied a few Italian yarns into the holes I had made inside to attach the journal text.
Needless to say, I did not make paper, or work much toward my real book while I was engaged in the construction of the altered Italy book. I gave the book to Kim as a souvenir of our trip together.
Saturday, December 29, 2007
Step Three: another try at making paper and printing
What luck! I was able to get some pristine white mat board from the Clyde Butcher studio - scraps that they had left over after framing the photos. I used this as the basis for the next batch of paper and it turned out pretty well. I have since used some of the paper in a small book I made plus I have used a couple of sheets as envelopes. Again I tried incorporating plant parts and yarn into the paper.
In order to practice bookbinding, I took apart an old book, pulled out the stitching, took the glue off spine, and threw away the cover. Then I put it all back together and created a new cover. After I successfully rebound the book, I tried binding a small book of my own. Into this one, I put a few pages of my own paper. A good start toward my real book! Now I know I can actually do it!
At holiday time I printed cards using a linoleum block print. More good practice. Sometime after the first of the year, I will make more paper and start planning the book.
One problem is that I am easily side tracked into projects that seem like fun. (Right now I am thinking about the other things I might make with paper pulp!)
Tuesday, April 3, 2007
Step Two: another try at printing
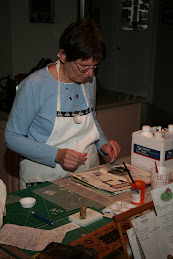
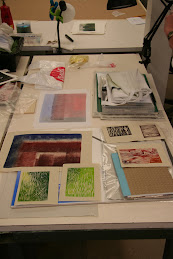
It is clear that I need much more experience in each of the areas required for my book. I was really floundering around as I made paper. I am sure I will improve though. Another area that requires practice is printing. In preparation for the trip I am taking to Italy, I am making additional mini-books as gifts/mementos for my cousins. Although there are still printed pieces available from the work I did at Penland, I need more variety so I set up the press. It took about an hour to make four prints from one of the blocks I made at Penland.
I was unhappy with the results. First, my press doesn't create enough pressure to make really good prints from this kind of artsy surface. Second, my inks were too gummy to give me the kind of impression I wanted. However I had one sheet that I can use to make the illustrations for the little books. And I got more practice!
Next I should spend some time printing with type. Binding is another skill that is going to take a lot of work. That will probably require a class.
Step One
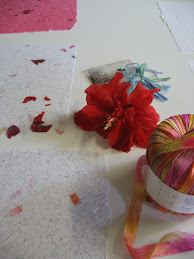
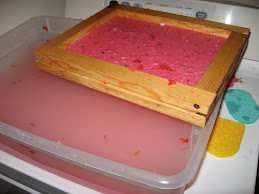
What a messy process it is to make paper! First I had to figure out where to do it. I decided the garage and laundry room were the most impervious to the water I expected to splash around. I had watched the video on papermaking by Catherine Nash several times so I would know what I needed and could visualize the steps. I had all my supplies. Since this was simply a practice session, not a time to make the real paper for my book, I decided to use the junk mail paper I had shredded plus some dryer lint as the basis. I soaked it overnight and then ran it through the blender in small batches until I had a tub full. That took an hour or so. I set the tub on the dryer in the laundry room. The couching surface was on the washer nearby which I covered with towels and felt. In the garage, I had set up a table with a drying board (actually a "white board" I bought at Lowes). It needed to be smooth to give my paper a smooth finish. The pulp was gray, which I expected because the junk mail was printed paper. The ink makes it gray. When I make the real paper, I will use white pulp.
This was very good practice. I could see that I had made the pulp a little thick. The paper was heavier than I wanted. When I tried to thin down the pulp, however, it stuck to the screen. This will take some practice to get the thickness I want. I dipped the screen, got a nice batch of pulp and let it drain. Then I tipped the layer onto the couching surface. I blotted it dry, took it to the garage drying board, and rolled it with a blotter. This was to dry the paper further and make sure it stuck to the board. After a couple of sheets, I decided to add some stuff to the pulp: flowers and cut up raffia. I liked the appearance of the flowers; however when the paper dried, the petunia petals turned brown. The rest of the flowers retained their color. Another area for practice!
After several hours of work, I had eight sheets of paper. This is not going to be a very efficient process, I can see that. Of the eight, there was one I liked. But I learned a lot!
Wednesday, February 14, 2007
The Book
When I retired in June of 2006 from my library career, one project I wanted to begin was the creation of my own book. This blog is an account of my progress. By "creation", I don't just mean writing. Rather my intention is to make the paper, write the text, illustrate it, print it, bind it, and create the cover. The idea is evolving as I move forward. But for now, I am considering printing 10 copies. They may all be different. It may be a series, instead of a book. I will create a unique cover for each book. The illustrations may also vary from book to book. This will help me stay creative rather than repetitive.
Since I spent most of the summer traveling, I took only small steps toward my goal. One of the retirement gifts I received was a certificate at Sarasota Art and Frame where I invested in some of the material and equipment I would need. Already I had a small proof press I had purchased years ago when we lived in Wisconsin. The press came from the Lake Mills Leader, a weekly newspaper that had moved ahead in the publishing world and got rid of its old printing apparatus. I purchased a variety of type, mostly Caslon Oldface, from Doug Etter, a retired printer in Lake Mills. I chose Caslon because it had been used at the Golden Cockrell Press, the topic of my independent study in library school.
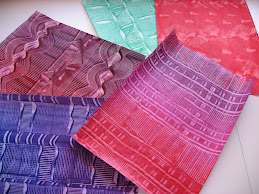
The first step I wanted to take was that of educating myself so I signed up for a class at the Penland School in North Carolina. That was a great idea! The class was called Pages and Possibilities, taught by Lynne Avadenka. We learned a variety of printing techniques and spent time in the studio practicing what we learned. Being around so many real artists was inspiring! And Lynne was an excellent teacher. She encouraged us, was non-judgmental, and pushed us to try new things. In the studio next to ours was a papermaking class that I sampled from time to time.
When I got home, I tried making some miniature books, using samples of the printing I had done in class for the illustrations. So far, I have made about ten of these. They are fun but not what I plan for my project. At holiday time, I printed some greeting cards just to get back to printing. It was good practice and a refresher in the use of my proof press.
So that's where I am at the moment. Next step is to try making paper. I have a video tape in lieu of taking a class since there isn't one being offered nearby.
Since I spent most of the summer traveling, I took only small steps toward my goal. One of the retirement gifts I received was a certificate at Sarasota Art and Frame where I invested in some of the material and equipment I would need. Already I had a small proof press I had purchased years ago when we lived in Wisconsin. The press came from the Lake Mills Leader, a weekly newspaper that had moved ahead in the publishing world and got rid of its old printing apparatus. I purchased a variety of type, mostly Caslon Oldface, from Doug Etter, a retired printer in Lake Mills. I chose Caslon because it had been used at the Golden Cockrell Press, the topic of my independent study in library school.
The first step I wanted to take was that of educating myself so I signed up for a class at the Penland School in North Carolina. That was a great idea! The class was called Pages and Possibilities, taught by Lynne Avadenka. We learned a variety of printing techniques and spent time in the studio practicing what we learned. Being around so many real artists was inspiring! And Lynne was an excellent teacher. She encouraged us, was non-judgmental, and pushed us to try new things. In the studio next to ours was a papermaking class that I sampled from time to time.
When I got home, I tried making some miniature books, using samples of the printing I had done in class for the illustrations. So far, I have made about ten of these. They are fun but not what I plan for my project. At holiday time, I printed some greeting cards just to get back to printing. It was good practice and a refresher in the use of my proof press.
So that's where I am at the moment. Next step is to try making paper. I have a video tape in lieu of taking a class since there isn't one being offered nearby.
Subscribe to:
Comments (Atom)