Monday, September 21, 2009
Late Coptic Binding
The class at the North Bennet Street School was everything I had hoped. There were seven of us plus instructor Shanna Leino. We had five sessions, 8:30 to 4:30, in which to complete our Coptic book. Shanna had set up our schedule so that we moved along at a good pace, accomplishing a great deal each day but with never a sense of being rushed or pushed. The first day we developed our cover design, made the cover boards out of papyrus, stained the text paper for an antique look, folded and cut the paper, and pared the leather strips for the inner cover edge. Day 2 was devoted to completing the design and transferring it to tracing paper, punching and sewing the text pages and end band, putting on the edge strips, glueing linen to spine, and paring the leather for the cover. On day 3, we transferred our design to the leather followed by doing the cut-outs, appliques, punching, inlays and blind tooling. Day 4 was for covering the book and day 5 we made the brass pegs and leather loops for fastening it. I was a little slow so it took me right up until 5 pm on Friday to finish. I also took pictures of everyone in our class with their finished book. These are posted on both Picasa and Flickr.
Friday, June 12, 2009
Summer Class Coming
One of my favorite book artists is Shanna Leino. I checked her website a couple of months ago and found that she is teaching two book binding classes this summer so I signed up for the one in Boston. It's at the North Bennet Street School from July 20-24. We will go directly from Boston to our place in Goshen, New Hampshire so we can attend the Sunapee Craft Fair in August. My next message will report on the class.
I am making progress on the Christmas books, too. While we were in New England for our grandson Trevor's high school graduation, I searched the Goshen house for letters and cumulated some additional facts for the biographies. Back to work.
I am making progress on the Christmas books, too. While we were in New England for our grandson Trevor's high school graduation, I searched the Goshen house for letters and cumulated some additional facts for the biographies. Back to work.
Wednesday, May 6, 2009
Bookbox
Although I have made boxes before, this is the first time I have made one of a size that would hold more than one small book. As part of a donated book basket for the Florida Library Association scholarship fundraiser, I decided to make three small books, about four by five inches, with coordinated marbled covers, plus a box to hold them. The box is covered with paste-decorated paper in a purple color that ties the items together. The book-bindings were sewn on tapes, even though they are fairly thin, at less than half an inch. (I decorated both the marbled and paste papers.)
I was pleased with the result overall. The next two projects I would like to undertake are more complex. One, I need to take a binding class that gives me additional grounding in basic and advanced techniques and teaches how to make leather covers. Two, I want to print copies of family biographies and then bind them as gifts. My next reports will address my progress in these areas.
I was pleased with the result overall. The next two projects I would like to undertake are more complex. One, I need to take a binding class that gives me additional grounding in basic and advanced techniques and teaches how to make leather covers. Two, I want to print copies of family biographies and then bind them as gifts. My next reports will address my progress in these areas.
Friday, March 13, 2009
A Soft Leather Binding
My work so far has given me enough confidence to try something a little more challenging. Therefore, using instructions from Meisterin Katarina Helene von Schonborn's website, I decided to construct a soft leather-covered Coptic book.
When David and I were in Paducah, Kentucky last year, we visited the Lower Town artist area where we discovered two fascinating studios. The artists were generous about providing tours of their workshops. Our first stop was with leather worker Phil Phillips, who has figured out how to make a living at his craft by not only creating the usual handbags and belts, but also hats, motorcycle gear, and authentic props for both historical films and Civil War re-enactments. From him I purchased a small piece of leather that is a perfect size for the Coptic book cover. The other artist was a Ike Erwin, bookbinder/restorer, married to a decorative paper artist Charlotte Erwin. Ike showed us his workshop and gave me numerous suggestions about what materials I needed and where to get them. We also purchased some pieces of decorative paper made by Charlotte. These have inspired me to work more creatively.
My project would be a simple journal. Before undertaking the binding, I laid out the pages as if this were a medieval manuscript, creating initialed pages, one for each month. This is a small book (about 4 x 5 inches) with enough pages for notes describing each month's activities. It has four signatures of 24 pages (sides) each. The typeface I used for the initial letters is an interpretation of Golden Cockerel, designed by Eric Gill in 1929 for the Golden Cockerel Press and cast by H. W. Caslon & Co. Of course, my letters are hand drawn, not printed.
Each letter is in a box with my own decorations related to the month. Since I live in Florida, these are not the typical summer, fall, winter, spring pictures. Instead, you will find water, sun, sea creatures, and a sandcastle for various months plus my favorite fruit strawberries for January, when they are just beginning to reach their glorious peak here.
Once the letters were complete and the leather cut to size, I could begin the binding. I used a fairly heavy waxed linen thread. The photos show a few steps in the process. I am quite pleased with the results so now I am searching for another form that will take me a step farther in my education. I hope to find a binding class that fits into my summer schedule.
Sunday, March 1, 2009
Progress Toward the Ultimate Book
If I were sensible, I would have added to this more often since now I have way too much to add. You won't want to read through it all. Hopefully you are good at skimming and can pick out what you want.
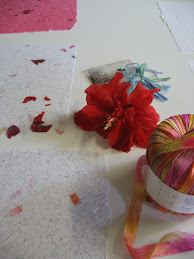
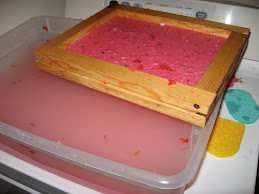
Over the past months, I have continued to practice various aspects of the craft of bookmaking. I made boxes, small books, more paper. In August of 2008, I returned to Penland School for a class making decorative paper with Steve Pittelkow and his assistant Sue Bjerke. Not only did we learn to make several kinds of decorative papers, including suminagashi, orizomi gome, paste paper and marbled paper, but because both our instructors are also skilled bookbinders, we learned how to sew and cover a simple case-bound book and how to complete a coptic binding. We also learned how to make boxes. I came home with a box full of decorated paper, sample books and several lovely boxes.
As a result of the class, I felt inspired and ready to move on to the next level. I practiced the skills I had learned, experimenting with several kinds of paper in an effort to see what worked for different uses. I purchased banner paper at Office Depot for making marbled Christmas wrapping paper. It took two days of marbling to make enough paper for the season, plus designs for our holiday cards.
Certainly, I learned some things. For example, although you can marble tracing paper, I advise against it since it is very fragile and must be lined in order to use it for anything. The banner paper worked out well and was cheap, plus light weight enough to work well for wrapping. Making boxes is very time-consuming but they are lovely gifts, especially if you have covered them with your own paper.
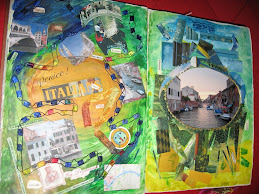
After the holidays, I completed a couple of projects that didn't get finished in time to give as gifts. I practiced suminagashi then covered a notebook with it, making a wine journal for my son-in-law. I was pleased with the subtle look of the design. In addition, I practiced the coptic binding on a rather frivolous datebook for my daughter and tried a couple more folded book designs that I learned at a short workshop at the Venice Art Center.
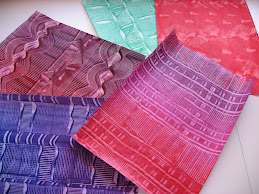
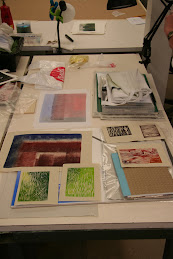
In February, I practiced with more marbled paper and tried making paste paper with cornstarch paste. The photos show the results. Following a bookbinding video, I was able to produce a nice little journal made with tapes.
Every day I walk on the beach, sometimes picking up unusual shells, trying to visualize how to construct a book out of them. It took much thought and conferring with my neighbor Nancy Stormer next door but I finally figured out how to make a shell book. The text is several poems; the illustrations are comprised of some photos and a number of sketches of the shells I like. It's printed on many different kinds of paper, some handmade, other types commercially produced, a few decorated. The binding is coptic, the endpapers are marbled fabric. In the photos, you can see both the outside and inside of this book, which is about 5 1/2 x 3 x 1 1/2 inches. The cover is made from a pair of pen shells.
It seems to me I grow ever closer to the day I can create my magnum opus. The next thing I need to learn better is binding. I am particularly interested in leather bookbinding so I have been researching where I might learn how to do this doing the coming year. One other note: I must mention that I could not be doing all these fun tasks if it weren't for my husband David. First, he remodelled one of our guest rooms into a workroom for me. That project included installing a wood floor and repainting every surface in the room. He also researched and ordered a great craft table that I can fold up when company comes so we can still use the room for guests. He accompanies me to whatever farflung places I want to go for workshops and then makes the odd tools I need. He has made all the marbling combs I use, built the sewing frame for binding, and invented a nifty device for punching the sewing holes. Every time I marble, he sets up the drying lines for me. It makes all the difference to have someone who is so supportive and patient!
Over the past months, I have continued to practice various aspects of the craft of bookmaking. I made boxes, small books, more paper. In August of 2008, I returned to Penland School for a class making decorative paper with Steve Pittelkow and his assistant Sue Bjerke. Not only did we learn to make several kinds of decorative papers, including suminagashi, orizomi gome, paste paper and marbled paper, but because both our instructors are also skilled bookbinders, we learned how to sew and cover a simple case-bound book and how to complete a coptic binding. We also learned how to make boxes. I came home with a box full of decorated paper, sample books and several lovely boxes.
As a result of the class, I felt inspired and ready to move on to the next level. I practiced the skills I had learned, experimenting with several kinds of paper in an effort to see what worked for different uses. I purchased banner paper at Office Depot for making marbled Christmas wrapping paper. It took two days of marbling to make enough paper for the season, plus designs for our holiday cards.
Certainly, I learned some things. For example, although you can marble tracing paper, I advise against it since it is very fragile and must be lined in order to use it for anything. The banner paper worked out well and was cheap, plus light weight enough to work well for wrapping. Making boxes is very time-consuming but they are lovely gifts, especially if you have covered them with your own paper.
After the holidays, I completed a couple of projects that didn't get finished in time to give as gifts. I practiced suminagashi then covered a notebook with it, making a wine journal for my son-in-law. I was pleased with the subtle look of the design. In addition, I practiced the coptic binding on a rather frivolous datebook for my daughter and tried a couple more folded book designs that I learned at a short workshop at the Venice Art Center.
In February, I practiced with more marbled paper and tried making paste paper with cornstarch paste. The photos show the results. Following a bookbinding video, I was able to produce a nice little journal made with tapes.
Every day I walk on the beach, sometimes picking up unusual shells, trying to visualize how to construct a book out of them. It took much thought and conferring with my neighbor Nancy Stormer next door but I finally figured out how to make a shell book. The text is several poems; the illustrations are comprised of some photos and a number of sketches of the shells I like. It's printed on many different kinds of paper, some handmade, other types commercially produced, a few decorated. The binding is coptic, the endpapers are marbled fabric. In the photos, you can see both the outside and inside of this book, which is about 5 1/2 x 3 x 1 1/2 inches. The cover is made from a pair of pen shells.
It seems to me I grow ever closer to the day I can create my magnum opus. The next thing I need to learn better is binding. I am particularly interested in leather bookbinding so I have been researching where I might learn how to do this doing the coming year. One other note: I must mention that I could not be doing all these fun tasks if it weren't for my husband David. First, he remodelled one of our guest rooms into a workroom for me. That project included installing a wood floor and repainting every surface in the room. He also researched and ordered a great craft table that I can fold up when company comes so we can still use the room for guests. He accompanies me to whatever farflung places I want to go for workshops and then makes the odd tools I need. He has made all the marbling combs I use, built the sewing frame for binding, and invented a nifty device for punching the sewing holes. Every time I marble, he sets up the drying lines for me. It makes all the difference to have someone who is so supportive and patient!
Subscribe to:
Comments (Atom)